Windows Command-line Reference

The Windows command-line tools are used to perform various tasks related to Windows Server 2008 R2, Windows Server 2008, Windows Server 2003, Windows 7, and Windows Vista. You can use the command reference to familiarize yourself with new and enhanced command-line tools, to learn about the command shell, and to automate command-line tasks by using batch files or scripting tools.

Here’s a test.  What does the Clip command do?

What’s scary is how many of these commands I actually do know.

Download


Posted in Uncategorized | Leave a comment

IIS and UNC paths

I installed a .Net 3.5 application onto a Windows 2008 Web R2 (64 bit) What makes this a little unique is that the ASP.Net code is stored on a UNC file share.  Because of this issue, I received the following error:

Security Exception
Description: The application attempted to perform an operation not allowed by the security policy. To grant this application the required permission please contact your system administrator or change the application’s trust level in the configuration file.

While searching I came across the caspol solution from Microsoft:

C:\WINDOWS\Microsoft.NET\Framework64\v2.0.50727\caspol.exe -m -ag 1 -url “file:////\\fs\share\*” FullTrust -exclusive on

After restarting IIS, all sorted.

Posted in Uncategorized | Leave a comment

Configure IIS Shared Configuration and site redirection.

I’ve recently started on a project that required IIS7.5 to be load balanced using windows network load balancing, part of the proposal was to describe how were the two web servers going to keep in sync, there were several options open to us.

After reviewing them all we proposed to have the two server load balanced using windows network load balancing, connected to the same IIS configuration using the built in “shared Configuration” tool, and then hold all the web data such as the sites and content on a Windows clustered back end file share. 

For the benefit of this post I’m not going to blog how to set up a pair of windows network load balanced servers, but i will document the steps you need to take to configure content sharing and how to redirect a site to a UNC path on a backend cluster share.

First off we will configure the steps to share the IIS config between the two web servers for this i assume you already have two servers with IIS role installed, and a shared volume that both servers will be able to see.

Configure IIS Shared Configuration:

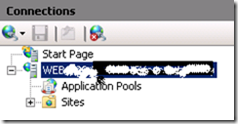
  1. On one other web servers launch the IIS manager, in the left pane highlight the server name as pictured below.
        image

2.   In the in the centre pane, then open shared configuration.

       image

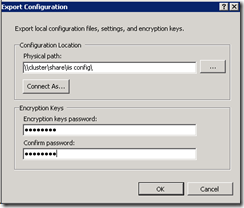
3.   In the right pane, select the export configuration

      Fill in the details for the share that you have created that both web servers can see.
       image

Enter an encryption key (this is a password that will be needed to add nodes to the shared configuration).

the next step is to add the nodes to both share the configuration.

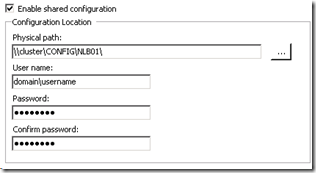
4.     Enable shared configuration box, and fill the details to the configuration files that you
        have just exported.
       image

5.     Restart IIS to apply the configuration, Repeat the impost on the other web server and hay presto, the servers are sharing the configuration and to test if you create a new site on one of the web servers you will see that is is mirrored on the other server.

Redirect the site content

The next part to the blog is to redirect the site content to ensure both web servers are using the same web content file, the benefit to this would be there would only be one location to upload new content to, you are sure that the content on both servers are the same.

Only a few steps to ensure that this is correct, and if you have already done steps above to share the configuration you will only have to do this on one of the servers as the configuration is mirrored and will automatically be replicated onto the other web server.

1.     Launch the IIS manager on one of the web servers,

2.     Right click on sites and select “Add new site”

3.     Under the physical path section enter the UNC path to your clustered share.
        (this share again needs to be accessible by both web servers.
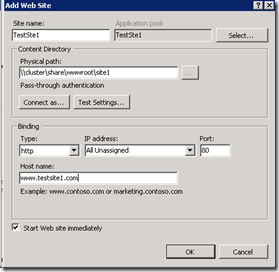
            image

4.     Once the site has been created, right click on it navigate to:
         “Manage web site>Advanced settings”
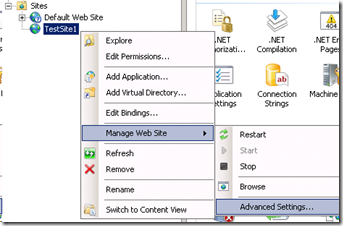
          image

5.     Under “physical path credentials” enter a domain account that has permissions to the
        clustered share as below.
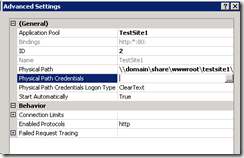
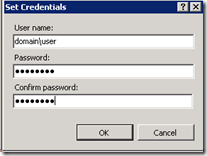
       image     image

6. Test the web site, and if you have configured the NLB content sharing as above look on the other web server and you will notice that the settings are visible and matched on both.

Hope this helps someone along the way.

JW

Posted in Uncategorized | Leave a comment

winmail.dat attachment

Recently vie had a problem with email contacts sometimes receive email messages with a strange file attached, called winmail.dat. When they attempt to open this file, either it can’t be opened at all, or it contains "garbage" data.

 
When an Outlook user composes and sends a message using Rich Text Format or HTML Format, Outlook automatically generates a file, winmail.dat, and attaches it to the end of the message. winmail.dat contains formatting information, in a human-unreadable form, that Outlook will use on the receiving end to display this email message correctly. Unfortunately

there are a lots of blogs that told me to change my email to plain text or change my firewall settings none of these solved my problem.

In the end (totally frustrated I decided to look at our Exchange install for the solution,  After digging for over an hour I found the MIME setting under Hub Transport role, I changed these to never use RTF and blow me, it started working, those users that could not receive the attachments suddenly were back OK.

Don’t know if this will help you as I’m not sure we had ever change this setting in the past but if it points you in the right direction….


Screen shot of the Hub Transport role.


Posted in Uncategorized | Leave a comment

Enabling MS Hyperv on HP DL380 G5

To run Microsofts new Virtual machine software HyperV on your HP DL380 G5, you need to enable a couple of settings in the BIOS.
 
After yo installed the OS and updated via windows update, go ahead and add the HyperV role in the "Manage My Server" dialog box. Now, if you try to start HyperV at this point, it will start as normal and run fine until you try to fire up your new virtual machine. At this point you will get the following error: "Hypervisor is not running" This means that your processor does not support virtualization or that it is not enabled.
 
Great……

To fix the issue:

Reboot your server and go into the BIOS by pressing F9. Go to "Advanced options > Processor Options" and enable these two sub-options:
"No-Excecute Memory Protection" – Enable
"Intel(R) Virtualization Technology" – Enable
Save with F10 to save and exit.

Go back into Windows and start up your HyperV console. The error should now be gone.

 
🙂
Posted in Hyper V | Leave a comment

Cool Support tool

 
If you’ve ever worked a help desk and become extremely frustrated while trying to coax an end user into accurately describing the problem that has been encountered, you are going to love a new tool in Microsoft Windows 7 called the Problem Steps Recorder. When started, this new tool will essentially record each and every step a user takes and document the entire operation in both screen captures and step-by-step details. When stopped, the Problem Steps Recorder will save the recorded information as a compiled HTML file and package it up in a ZIP file that the end user can then e-mail to the help desk.
 
Recording a problem
 
 
for a full catch up on this hidden gen please read the fll blog at HERE although it was written using the beta of Win7 nothing has realy changed and makes a good read.


Posted in Windows 7 | Leave a comment

Microsoft Security Essentials

Today Microsoft releae their Security Essentials suit that provides real-time protection for your home PC that guards against viruses, spyware, and other malicious software.


Microsoft Security Essentials is a free* download from Microsoft that is simple to install, easy to use, and always kept up to date so you can be assured your PC is protected by the latest technology. It’s easy to tell if your PC is secure — when you’re green, you’re good. It’s that simple.

Microsoft Security Essentials runs quietly and efficiently in the background so that you are free to use your Windows-based PC the way you want—without interruptions or long computer wait times.

Download LINK

About time Microsoft, but at first impressions this looks great, ive done the normal Viru$ testing and it seems to grab them all early, Even to the point of grabbing them from other AV applications.
 
Posted in Uncategorized | Leave a comment

Hyper V Server R2


(a)    High availability and live migration for managing a dynamic IT infrastructure

(b)    Support for 64 logical processors future proofing our customers to scale up with the hardware

(c)    Support for running up to 384 virtual machines with up to 512 virtual processors

(d)    Processor compatibility mode for live migration across different processor SKU’s from the same vendor

(e)    Hot add/remove virtual storage

(f)     Networking enhancements (VMQ, Chimney, support for Jumbo Frames)

(g)    Simplified management using sconfig

(h)    Boot from flash

Many thanks to Vijay Tewari.

Posted in Hyper V | Leave a comment

SYSVOL FSR problems

File Replication Service (FRS) is used for synchronising the SYSVOL shared folders on domain controllers and for synchronising DFS link targets on servers running Windows.
 
Recently i had a DC that was strangely not replicating policies over a WAN link.
 
after scratching our heads and looking over very long and boring event logs from the server and SCOM i download a tool called SONAR, free download from Microsoft  <HERE>.
 
this spotted strangely the SYSVOL share had been unshared…….. Strange but true,,, anyway without this tool it would have taken several hours longer and more scratching my head over event logs.
 
Download it and see for your self.  Worth its weight in gold.
 
Jason
Posted in AD | Leave a comment

Boot from VHD

 
One of the hidden gems in the new Windows BETA offering from Microsoft is one that allows you to boot from a VHD file.
Windows 7 Beta and Windows Server 2008 R2 Beta support booting into the OS from a VHD file attached to Virtual PC or Hyper-V.
Follow the simple steps below and be amazed how easy it is…….
 
Right-Click on “Computer” and select “Manage.” From there expand “Storage” and right-click on “Disk Management” and select “Create VHD.”
 
 
Select what VHD you would like to boot from and select the VHD size and click OK.
 
 
Once you have created the VHD file, boot your machine with the OS DVD in the drive and choose “Install Now,” then press SHIFT+F10 to get the command prompt. Type the following:
 
 
When you return to the installation procedure, you will see a 20GB partition.You will be warned that you cannot boot from this volume – ignore this message and continue the install.
 
When you boot up, it will make Windows 7 the default boot option. You can change this using bcdedit
 
This is a great way installing multiple copies of Windows 7 or Windows Server 2008 R2 on a machine or storage area network without creating multiple partitions
 
To give you an idea of where this could be use useful take a school that has hundreds of students PC’s that could share the same VHD file that would be write protected and simply refreshed every time the machine is rebooted.  or a call center that used windows during the day for office based tasks and then swop’s to Linux during the night for data mining……. the possibilities are endless, WELL done Microsoft!
 
Have a play and enjoy… I think you will be presently surprised how cleanly this works.
 
Jason


Posted in Windows 7 | Leave a comment